Install & setup 
Installation  
pip install lamindb
You can configure the installation using extras, e.g.,
pip install 'lamindb[gcp]'
Supported extras are:
# cloud backends (AWS is in default installation)
gcp       # Google Cloud (gcfs, etc.)
# biological artifact formats
fcs       # FCS artifacts (flow cytometry)
# storage backends
zarr      # store & stream arrays with zarr
If you’d like to install from GitHub, see here.
Sign up & log in
Sign up for a free account (see more info) and copy the API key.
Log in on the command line:
lamin loginYou will be prompted for your API key. You can create your API key in your account settings on LaminHub.
Note
An account is free & signing up takes 1 min.
Through signing up, Lamin does not store or see any of your data, only your email address.
If you create a LaminDB instance through the global LaminHub at https://lamin.ai, Lamin will host your metadata on AWS and provide a default storage location on S3.
This does not apply when calling lamin init locally. If you want to connect an existing LaminDB instance to LaminHub to benefit from additional features and management of the database: please reach out.
For more information re Lamin’s access to your data, see the source code, the privacy policy, or our certified commitment to security.
On the command line, you can log in with your handle if you have a cached API-key:
lamin login testuser1
Log out:
lamin logout
Init an instance
Initialize an instance using lamin init on the commmand line and these options:
storage: a default storage location for the instance (e.g.s3://my-bucket,gs://my-bucket,./my-data-dir)name(optional): a name for the instance (e.g.,my-assets)db(optional): a Postgres database connection URL, do not pass for SQLitemodules(optional): comma-separated string of registry modules
If you are only interested in tracking artifacts and their transformations, init your local SQLite instance via:
lamin init --storage ./mydata
Mount the Bionty module:
lamin init --storage mydata --modules bionty
You can also pass an AWS S3 bucket.
lamin init --storage s3://<bucket_name> --modules bionty
Instead of SQLite, you can pass a Postgres connection string.
lamin init --storage gs://<bucket_name> --db postgresql://<user>:<pwd>@<hostname>:<port>/<dbname> --modules bionty
Connecting to an instance
Connect to your own instance:
lamin connect <instance_name>
Connect to somebody else’s instance:
lamin connect <account_handle/instance_name>
Access settings
Now, let’s look at a specific example:
!lamin init --storage mydata --modules bionty
Show code cell output
→ initialized lamindb: anonymous/mydata
Print settings:
!lamin settings
Show code cell output
Configure: see `lamin settings --help`
<lamindb_setup.core._settings.SetupSettings object at 0x7f256573a300>
Settings persist in ~/.lamin/ and can also be accessed via lamindb.setup.settings.
The settings directory can also be configured using LAMIN_SETTINGS_DIR environment variable.
import lamindb as ln
Show code cell output
→ connected lamindb: anonymous/mydata
ln.setup.settings.user
Show code cell output
Current user:
 - handle: anonymous
 - uid: 00000000
ln.setup.settings.instance
Show code cell output
Instance: anonymous/mydata
 - storage: /home/runner/work/lamin-docs/lamin-docs/docs/mydata (None)
 - db: sqlite:////home/runner/work/lamin-docs/lamin-docs/docs/mydata/.lamindb/lamin.db
 - modules: bionty
 - git_repo: None
Note
The user who creates an instance is its owner. Ownership can be transferred in the hub.
Advanced users could also consider the Python setup API:
lamindb.setup.
Use paths with s3-compatible endpoints
This is an experimental feature.
It is possible to init an instance with a path that uses an s3-compatible endpoint url. Such endpoints allow to access non-s3 buckets using the same API that is used for s3.
lamin init --storage s3://<bucket_name>?endpoint_url=http://endpoint.com:port
This assumes that the endpoint url is http://endpoint.com with a port specified.
It is also possible to set a path with s3-compatible endpoint as a default storage for an existing instance for the current python session.
import lamindb as ln # connected an existing instance
ln.settings.storage = "s3://<bucket_name>?endpoint_url=http://endpoint.com:port"
# or using ln.UPath
ln.settings.storage = ln.UPath("s3://<bucket_name>", endpoint_url="http://endpoint.com:port")
Manage the cache directory
lamindb maintains a local cache for files and folders stored in the cloud (e.g., AWS S3, Google Cloud Storage, HTTP, Hugging Face, etc.).
When an Artifact object representing a file or folder in the cloud is accessed for the first time via cache() or load(), it is downloaded to the cache. Subsequent accesses read from the cached copy, as long as the original file or folder did not change.
The cache directory can be accessed via lamindb.settings:
ln.settings.cache_dir
Show code cell output
PosixUPath('/home/runner/.cache/lamindb')
Or via the CLI:
!lamin settings cache-dir get
Show code cell output
The cache directory is /home/runner/.cache/lamindb
It can be configured via the CLI or by setting the LAMIN_CACHE_DIR environment variable. Here is the CLI command:
lamin settings cache-dir set some/path/to/cache
Configuring a system-wide cache
If you are using lamindb on a multi-user system such as a shared compute cluster, you can configure a shared default cache for all users to avoid duplicating cached data for each individual user.
To set this up, first find the location of the lamindb system settings directory. It can be done via CLI
lamin info
In the Local directories section, locate the path shown in system settings - this is the directory you need.
In this directory you need to create a text file system.env that contains a line with the path you need for the system cache folder (repalce absolute/path/to/your/system/cache with your path)
lamindb_cache_path=absolute/path/to/your/system/cache
This cache folder will be used by default for all users on the system unless they explicitly configure their own cache folder with CLI lamin cache set.
Disconnect from an instance
Connecting to an instance means loading an environment for managing your data.
When connecting to a new instance, you automatically disconnect from the previously connected instance.
If you want to disconnect from the instance without connecting to a new instance, use lamin disconnect
Database schema & modules
Any LaminDB instance can mount custom schema modules with any number of registries
Each schema module is a Python package that defines registries using the
SQLRecordclassEvery registry corresponds to a SQL table in the underlying Postgres or SQLite database
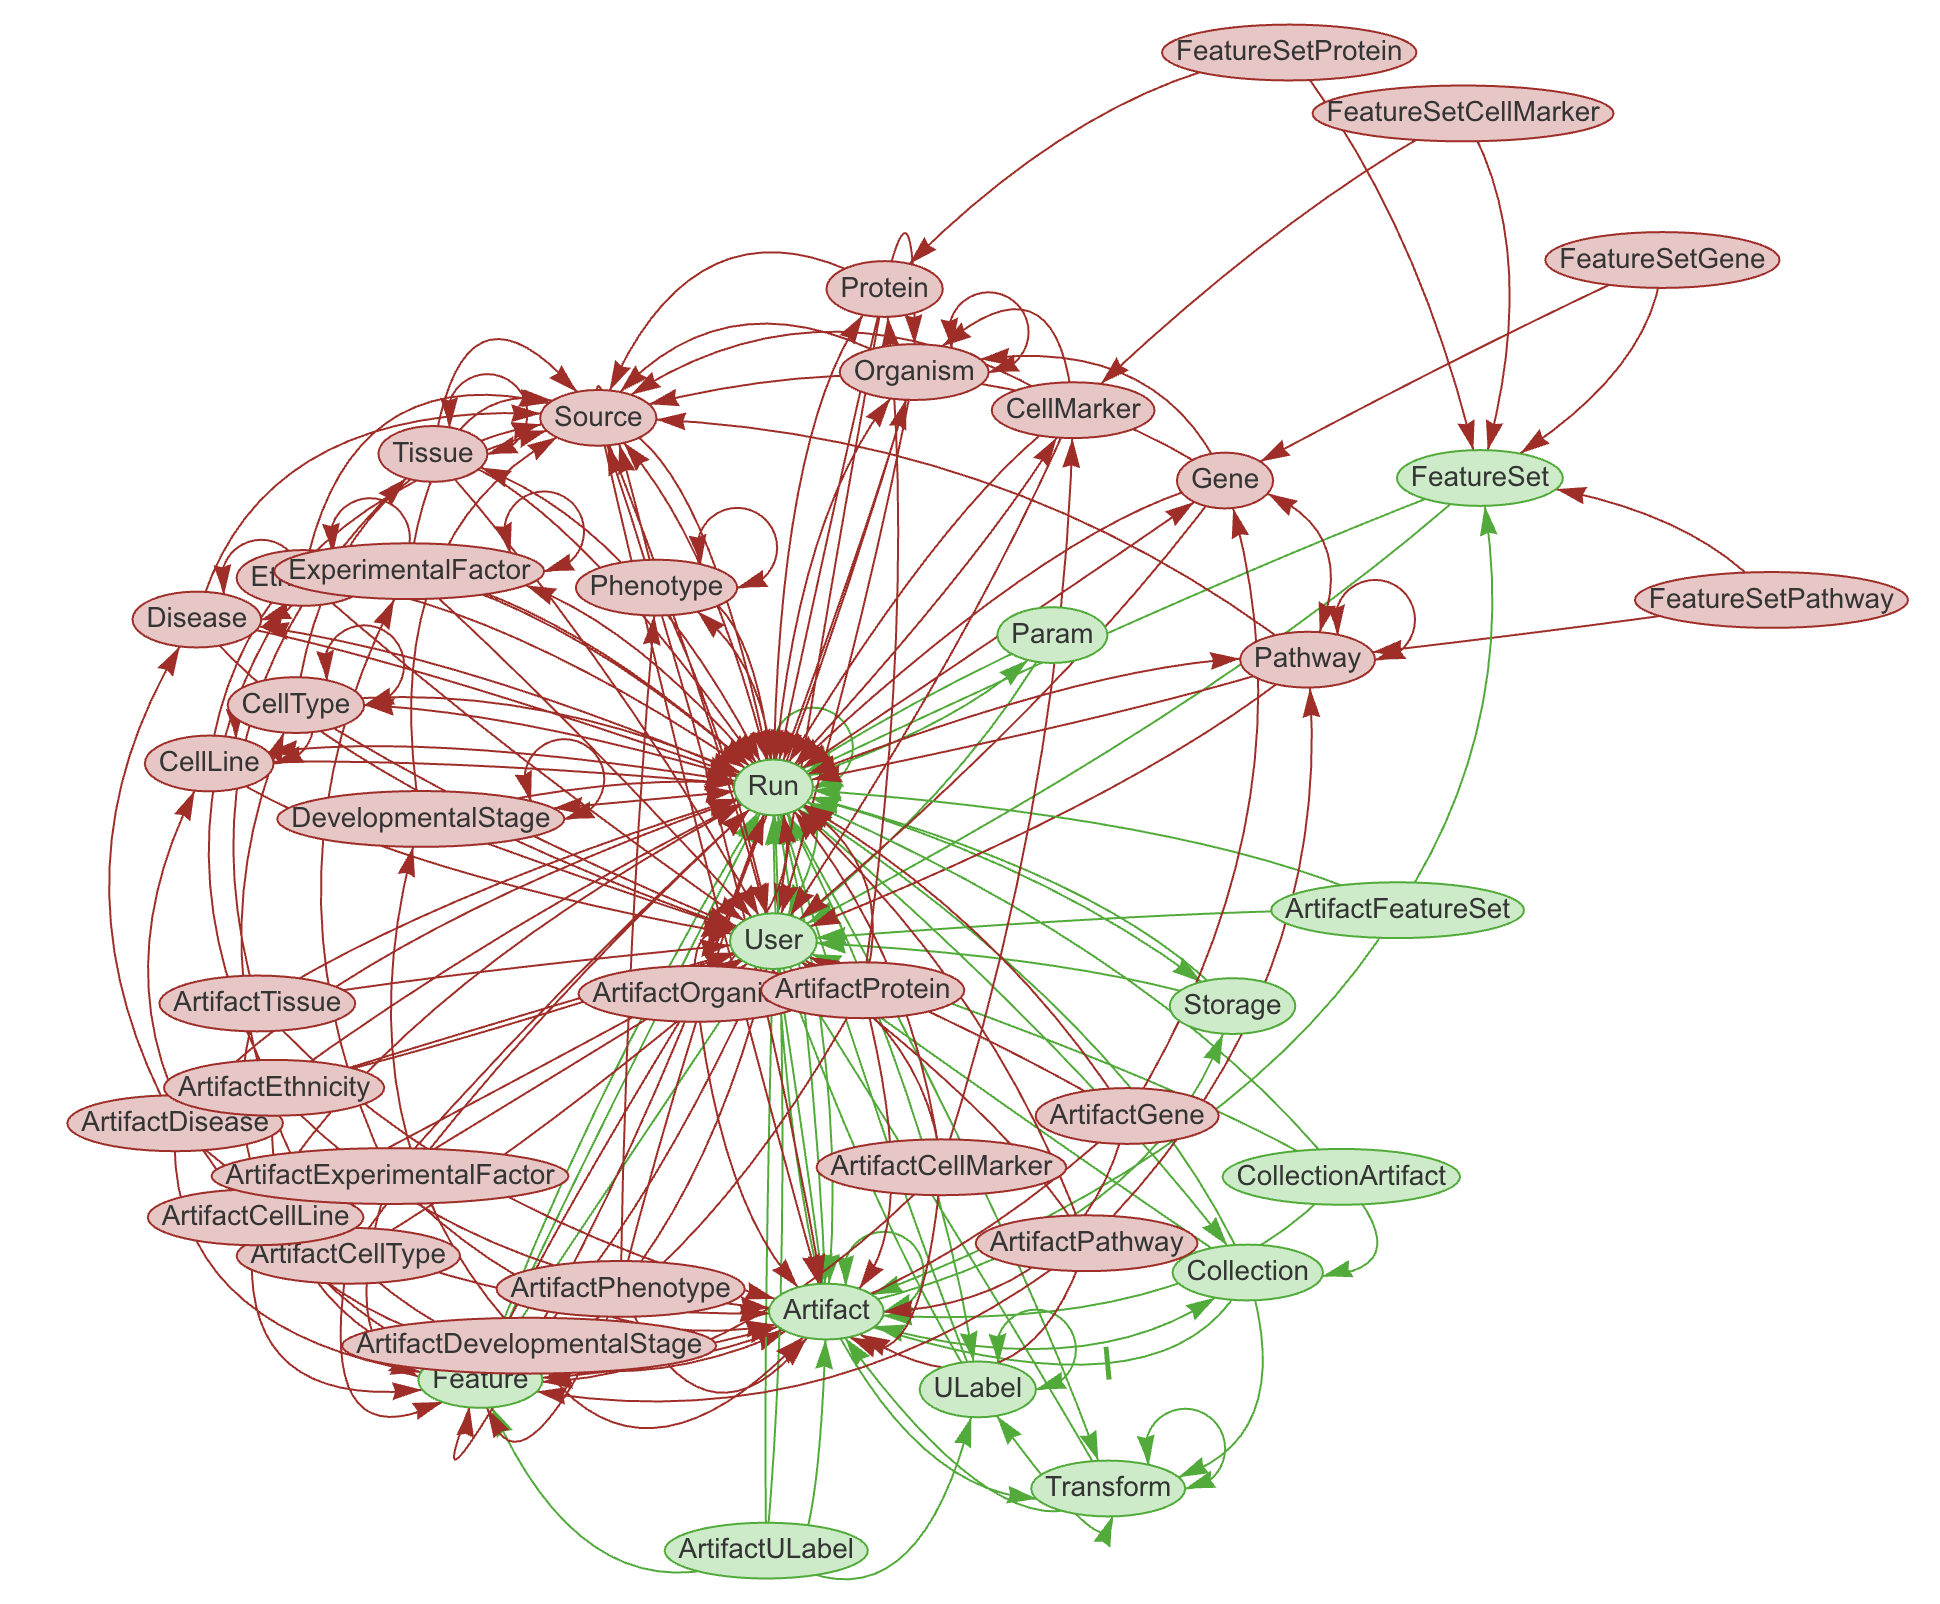
The core database schema is built into the lamindb API.
Almost all of LaminDB’s central classes, like Artifact, Transform, User, etc. are registries. You can see their source code here.
Compatibility matrix
Below is the compatibility matrix for the core lamindb schema. To upgrade the state of the SQL database (DB) from a lower version to your current Python package (PP) version, you call: lamin migrate deploy
🟢 = full API works
🟡 = hard-delete of some records might error because an auxiliary table was removed, soft-delete & remaining API work
🔴 = errors on basic operations because a field was added to or removed from a registry
– |
PP 2.6 |
PP 2.4 |
PP 2.2 |
PP 2.1 |
PP 2.0 |
|---|---|---|---|---|---|
DB 2.6 |
🟢 |
🟢 |
🟢 |
🟢 |
🟢 |
DB 2.4 |
🔴 |
🟢 |
🟢 |
🟢 |
🟢 |
DB 2.2 |
🔴 |
🔴 |
🟢 |
🟢 |
🟢 |
DB 2.1 |
🔴 |
🔴 |
🔴 |
🟢 |
🟢 |
DB 2.0 |
🔴 |
🔴 |
🔴 |
🟢 |
🟢 |
Custom modules
You can set up your own modules & registries or reach out for support within Lamin’s Team or Enterprise plan.
You’ll see how simple it is if you look at this example: pertdb/models.py. You only need a single Python file to define registries via data models.
If you are an admin, you can use two commands to create and deploy migrations:
lamin migrate create(only needed when creating your own custom modules)lamin migrate deploy
Create a migration
You need to have the package installed locally:
git clone https://github.com/my-org/my-module
cd my-module
pip install -e .
Edit the registries in your module.
Then, call
lamin migrate create
to create the migration script.
When you’re happy, commit them to your GitHub repo, and ideally make a new release.
Deploy a migration
To deploy the migration call lamin migrate deploy.
Note
The lamin migration commands are a wrapper around Django’s migration manager.
Delete an instance
This works as follows. It won’t delete your data, just the metadata managed by LaminDB:
!lamin delete --force mydata
Show code cell output
! calling anonymously, will miss private instances
FAQ
Where is the SQLite file of a LaminDB instance?
The SQLite file is in the default storage location of the instance and called lamin.db.
You can also see it as part of the database connection string:
ln.setup.settings.instance.db
#> sqlite:///path-to-sqlite
If the default storage is in the cloud, the SQLite file is cached in the local cache directory (cache_dir):
ln.setup.settings.storage.cache_dir
#> path-to-cache-dir